


Easy Construction Paper Christmas Crafts for Kids
We’re adding pop-color to Christmas this year with a folk-inspired palette. So if you have colorful paper left over from summer paper-cutting projects, take it back out, gather the family or friends and get started.
Colorful Paper Ornaments
If you like quilling, you’ll love making these ornaments which are inspired by traditional Polish folk decorations. Historically often made from brightly dyed thin wood veneer, these colorful abstract characters are easy and fun to make out of paper. Popular mixes of colors include pink, yellow, blue, navy, red, orange and green.
What you’ll need;
- Paper — Craft cardstock in a choice of colors. The more colorful, the better!
- Dual Strip Cutter — for cutting even paper strips
- Craft Knife — if you prefer to cut paper with this tool
- Non-slip ruler
- Small Binder Clips and Paper Clips — These will act as a helping hand when putting together the ornament.
- Glue
- Cutting Mat — a large one, to cut paper and use as a workspace
- String or Ribbon — to hang your ornaments
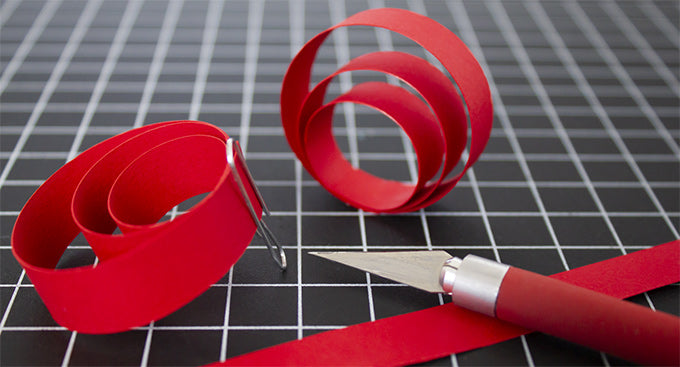
Select your cardstock colors, place on the cutting mat and then cut into ½” strips, either using the dual strip cutter or the craft knife and a ruler.
Once all the paper is cut, pick out your colors. With ornaments, symmetry is key, so set aside two of each color for the top and bottom element. Trim the strips into 4”, 5”, 6” and 7” lengths in whatever color order you like. We used pink, yellow, light green and blue.
Start with a 4” strip and form into a teardrop shape by swirling the paper. Add a drop of glue to the ends and secure in place with a binder clip. Add the swirled 5” strip by gluing it at the ends only. Then, add the 6” strip, again by gluing at the ends only. Help to secure the glue with a binder clip each time. When adding the last 6” and 7” strips, add a drop of glue to the apex as well and use a paper clip to secure them in place.

Next, cut two 1.5” strips, and on one end, cut to an arrowhead point. We used navy colored paper. Swirl to slightly curve the paper strip and glue to both sides of the ornament. Use a binder clip to help the glue set in place. Then, cut two 5” strips. We used orange and cut one end to a point like the previous navy strips. Swirl the other end until the paper starts to curl. Quill into a small roll so that the piece measures about 1.5” and glue the roll in place. Once set, attach these on top of the navy pieces about .5” above. Set aside.
Now, cut two 12” strips half an inch wide. We used red colored paper. Using your fingers, swirl each strip of paper until they naturally start to roll. Roll into a spiral to create three circles. Manipulate as needed so that the paper ends are overlapping in the same spot. Then, glue each layer and set using a paper clip. Make two. Using the same color paper measuring 1.5”, connect the two pieces at the glue points. Use a paper clip to hold in place while the glue sets.
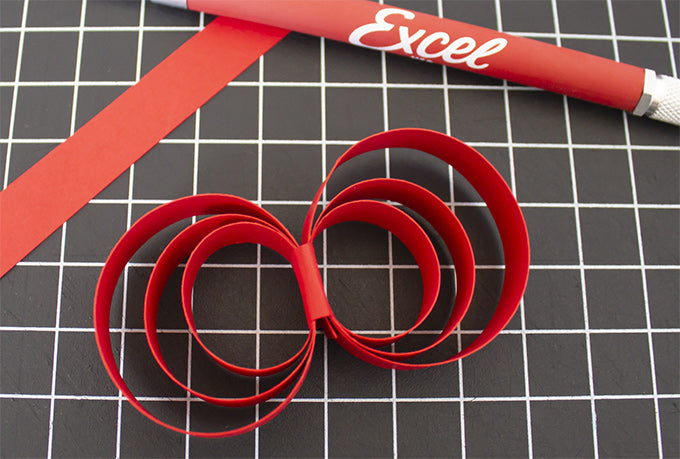
Once all the larger parts are assembled and glue is set, glue them to each other — once again using paper clips to help set the glue flat.

Lastly, cut a string to the desired length and attach to the ornament. Ornament metal hooks are also an option.
You can make other variations of this type of ornament ranging from simple concentric circles and hearts to more complex like we detailed here. Check out our Instagram or TikTok for instructional videos.

Colorful Paper Chain

A reinterpretation of the classic paper chain we know and love!
What you’ll need:
- K26 Grip-on Knife
- Ruler with non-slip backing - Alumicutter
- Cutting Mat
- Colorful Paper — We used the same colors as for the ornaments to keep on theme: navy, bright blue, pink, green, yellow, orange and red.
Cut thin and long strips of paper, approximately ¼” x 10” and make a single chain alternating the colors randomly. Then, double up each link with another color. Try to mix the colors up as much as possible.

You should now have a double chain. For the final step, slightly criss-cross each double link and glue in place so that each link is 3-dimensional like in the photo. Repeat this step for all links. Because the strips are long, the chain will be finished quicker than you think! Plus, this is a fun activity for the whole family.
Colorful Scrap Paper Christmas Trees

Now that you’re left with scrap paper from all the other decorations you’ve been making, it’s time to put them to good use and make something beautiful.
You’ll need:
- Scrap paper cut into strips
- 12”x12” Craft Paper sheet — this is for the tree shape
- Craft knife or craft scissors
- Glue
Cut out a quarter circle at least 12” tall and assemble into a cone. This will be the base for your tree. And don’t worry about being neat because this part will all be covered up.
Cut up your leftover paper strips into smaller pieces, approximately 1” to 2” long. You should have a nice mix of colors and lengths.
Start gluing the strips vertically beginning at the base of the cone and working your way around until you have a row of colorful strips. Don’t overlap. It’s OK to leave a little space between the strips. Continue by adding a second row and place the strips slightly to the side of the strips in the row below. Once the row is finished, go on to the next rows until the whole cone is covered.

Once the cone is decorated and the glue is set, using your fingers, slightly swirl the bottom of the strips so that they protrude from the surface like in the photo above.
We hope you have fun with these and come up with your own unique creations!
Happy decorating and Happy Holidays!